Sunday, October 31, 2010

The Green HIlls of Ireland

My sisters and I got together one week in October to see if we could make landscape quilts. That is we all got together, but only Charlotte and I worked on landscapes. Janie had did some really cute quilted Hum-bug bags and Margi had a big craft show coming up and needed to continue to work on that. Below is the quilt that I made. It is vaguely based on a photo of County Galway in Ireland. I have never been to Ireland but have always wanted to go there. This may be the closest I will ever get....
I used almost all hand dyed fabrics that I dyed using acrylic colors in my microwave oven. I wet the fabric, squirted paint on it, then squished it around with my hands (wearing rubber gloves, of course), wrapped rubber bands around it, squirted some more watered down paint on it, stuck it in the microwave to get really hot, then set it outside to dry. The hardest part was waiting for it to dry.....
These are my brightest colors....
My mediums....


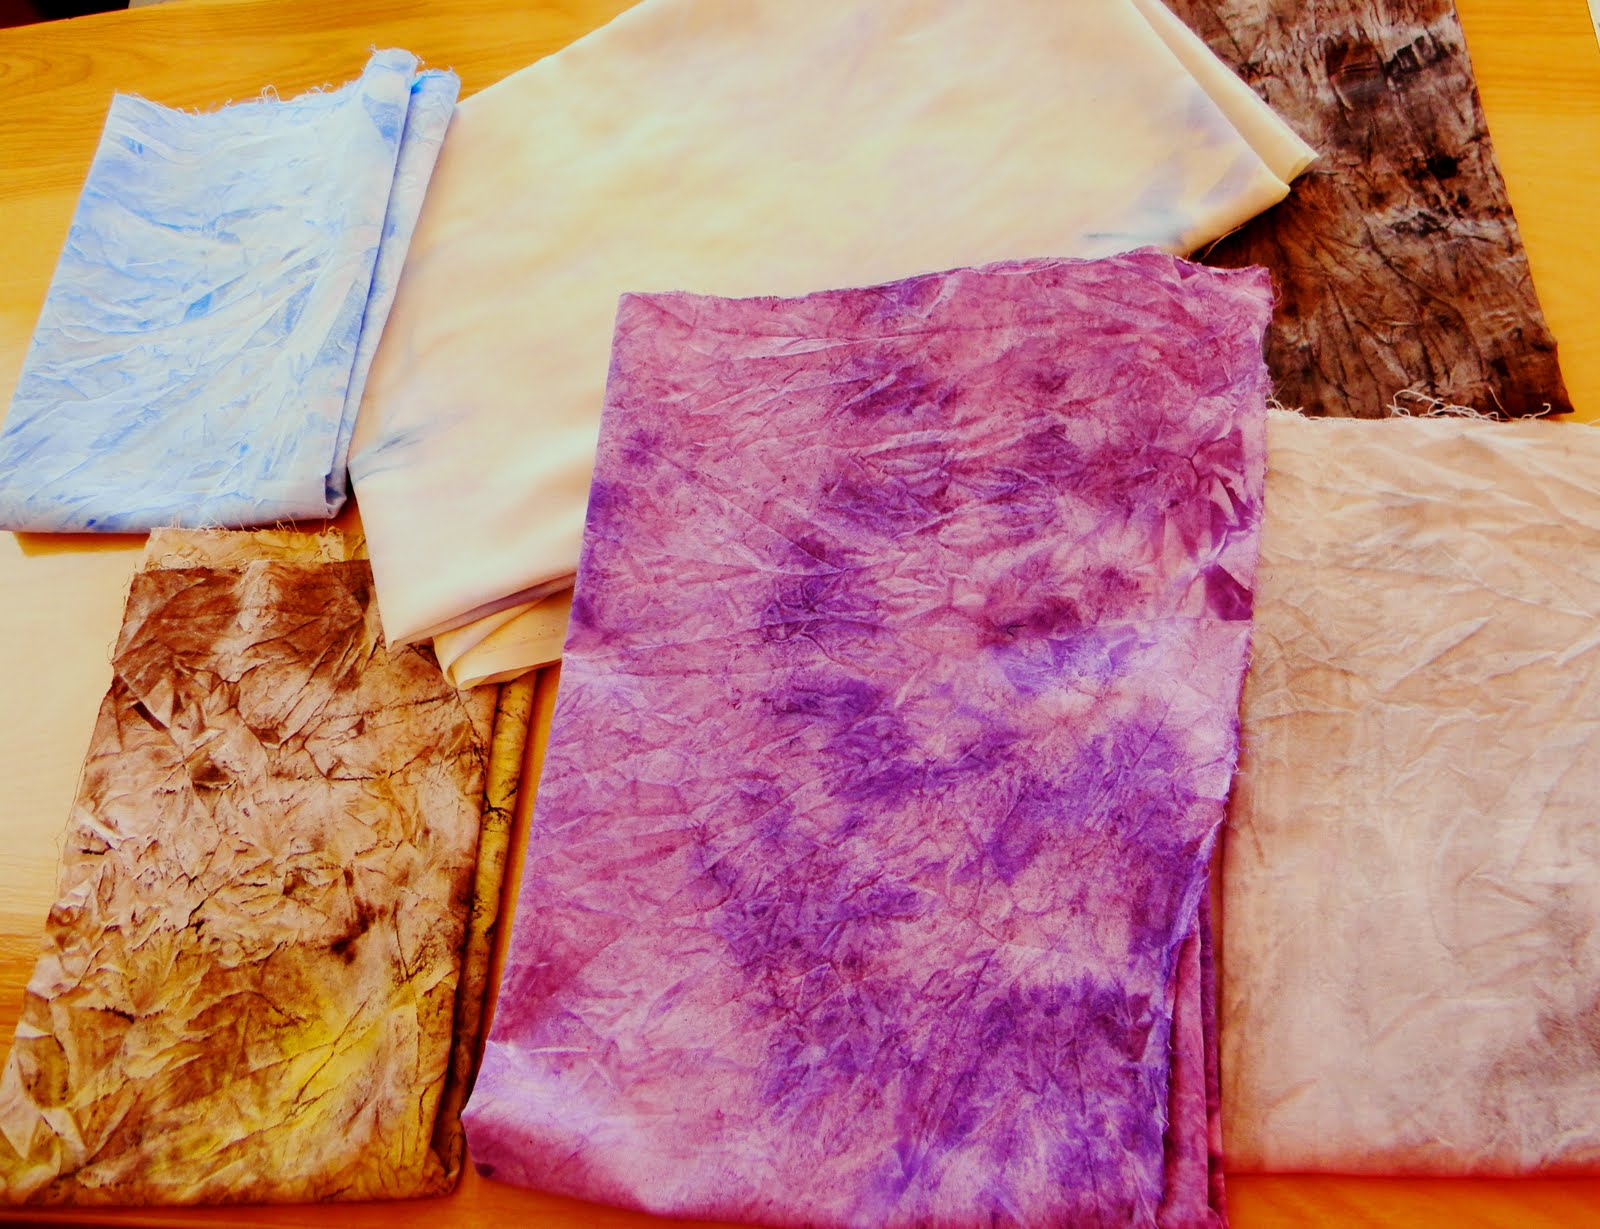
and a stack of all the hand dyed fabrics. I did not use all of them, obviously...so.... I see another landscape quilt in my future.....


This is the first night at Charlottes house... Larry took the photo of all of us. Janie and I were exhausted from the drive (9 hours) but were so glad to be there we perked right up and sat there talking until late...


The girls are ready to go shopping....We hit Jo Ann fabrics first thing in the morning!


Looks like we are checking our wallets....hmmmm maybe not...

Shop, shop, shop....sew many fabrics...sew little time....


What were they thinking when they designed this one?????? ewe....

Granny found a good one! Go Granny!

shop, shop, shop.....

Lord.... Make me a bird... but not on my fabric....
And we end our shopping with a little (fuzzy) holiday inspriation.... sorry I made you fuzzy Margie... I had a wrong setting on my camera....my bad...

And last but not least....Voila! Granny Bell! Aint she cute?

Thursday, October 14, 2010

OMG! I quilted the whole da....darned couch!

This project has taken me 5 long months to complete. There have been many ups and downs during the process, but it is finished now...YIPPEE!
I started with a basic kaliedescope quilt in shades of brown, teal, blue and beige. I used MANY spools of thread, many yards of fabric, and many hours of my time.
I apologize for the quality of the photos below. Some are better than others...they got much better after I cleaned the camera lens...nuff said... Check out the rest of 'em!
The quilt back is made of leftover fabrics from the front and from fabrics I bought for the front but did not use.
Below, is the foundation of the couch. I quilted whole cloth in muted golden brown on the arms and the same fabric in dark brown on the front. I tacked it down in several places so it will not shift as so many couch covers do, but the tacks are easily removable when I need to wash the cover.

Here, the quilt is simply laid over the seat cushions and back.

VOILA! Add the cushions and as you can see, I have quilted the whole couch!


The ENTIRE couch...

This couch is in my sunporch and it makes a great bed. Which is what gave me the idea to quilt the couch in the first place. It also gives me a great place to snuggle in while watching TV!

This is a closeup of the arm treatment...
Closup of cushions...They are all zippered covers so they are easily removed for laundering. Sooooo.... I can now wash my couch..... cool...
more cushions
Closup of some quilting. I used the meandering free motion quilting style because it was the easiest one to master and I wanted fairly dense quilting because this quilt will get a lot of use on my sun porch!
And last but not least.... my remote control and eyeglass caddy! I used to just keep them on the arm of the couch and they either wound up on the floor or in the couch cushions!
This was really a huge project and at times I was discouraged about finishing it. My 3 sisters have teased, cajoled, and encouraged me to keep going on it and I thank them all for that.... I would not have finished it without them!
Big thank you hugs to all of you!


Saturday, October 2, 2010

I should be posting pictures of my completed (YEAH!) quilt, but I have not photographed it yet. Those pics will have to wait until I finish the pillow covers so I can get the whole effect.
We just had a few days of rain after having had sunshine for about a month. During the dry spell, we installed a 'doggie door' so the dogs can come and go outside as they please. Then it rained.....and rained.....
News flash! Dogs don't wipe their feet!
So I started shopping for an absorbent rug that they would have to walk across to dry their feet when they came in. Long story short...I could not find anything in the price range that I was willing to pay. I have been using some old beach towels layered together and they do a pretty good job as long as they stay put (which is not very long). So I decided to make a rug with pile thick enough to wrap up around paws as they stepped inside.
I shopped for the least expensive all cotton fabric I could find.
Below is an example of what I found for $1.99 a yard on clearance. I bought 10 yards and 3 yard of the turquoise for .99 a yard and cut it all it to 2 inch wide bias strips.

Each bias strip was ruffled down the center by zigzagging over a strong thread. I found that I could ruffle it as I sewed if I just tugged on the cord in short tugs while sewing.
I started in the center and sewed an 8 inch strip of ruffle in the center of a 54"X48" piece of canvas, then turned to continue sewing the ruffle beside the first piece. Being careful to but the 2 ruffles up against each other.
And continued going around and around with the ruffle. I added a bit of turquoise ruffling.
Stitching down the ruffles was not difficult until I was about half way thru the project. Then it started to get heavy and more difficult to manage.
I persevered and managed to get 12 yards of fabric into my rug!

When I cut the strips of bias, they tended to get tangled so I made rolls out of them and thought of a way to make that work for me. A basket, an old long handled paintbrush, two clips and I was off and running. I ruffled 5 of these rolls (6 counting the turquoise)! Nearly fell asleep at the sewing machine as I sat there hour after hour watching it go under the presser foot.


This is the finished rug. It measures 31" X 48". It's not perfect, but it has a one inch pile and made of absorbent cotton.
I don't particularly like the brightness of the turquoise, but I expect after a few weeks of puppy paws walking across it with North Carolina mud on the, the color will tone down considerably!
I hope it washes well, but will post a photo after the washing!


Tuesday, August 31, 2010

One step closer!

The ongoing quilt project is going on. One of my sisters said that I have gone from doing a Big Honkin` Project to doing a Big Ass Honking Project. I think she is right....
I increased my fabric stash substantially buying and rejecting different fabrics for this quilt. I did not plan well, but I have learned a great deal. First lesson: Spend more time planning! Even though there were some fabrics that were rejected for the quilt top, they would all have been fine for the backing. The problem was that most of them were bought online and I did not want to buy too much yardage until I new they would work for me. Anyway, long story short, I decided to make this quilt reversible and use up some those small pieces (1 yard or less) of fabric and this is what I came up with. An easy to piece log cabin design. I put some sashing around the outside edges this morning (no photo yet) and am ready to start sandwiching the quilt this afternoon. I have never quilted anything this large on my sewing machine, so it will be a challenge! Since this will be a quilt that will be used and laundered quite a bit, I plan to do a fairly small stipple stich to quilt it with. Wish me luck!

Friday, August 13, 2010

The making of a quilt....in many stages...

So.... I have this idea for making a quilt. I have fallen in love with kaliedescope quilts and am on my third one. The other two were much smaller (one a tablecloth and one a wall hanging) shown below.


The one I'm working on now is for the couch on my screen porch. It is kind of a couch/bed. My idea is to make a quilt that will fit nicely over the seat of the couch and make matching covers for all the loose pillows on the back of the couch. I keep a quilt on it now, but it does not match anything and looks very tacky... as seen in the photo below....
Here are the first hexagons for the new quilt!


Here I have put together the hexagons for the center of the quilt.


I have added the borders, but it is a full size quilt, so I laid it on table and photographed one corner.
I want to quilt everything at one time and have started on the cushions. I have never quilted a large quilt before, so I wanted to quilt the cusions first. Here are some preliminary shots of the cushions.

This is the back of a small cushion. I had a lot of problems with it. Thread breaks, skipped stitches, and just not having a good plan of what I was going to do with the free motion design.

This is the back side of the one above and I think it looks better than the front! However, I am using scraps for the inside of the cushions and red will definitely not be a part of that room!


This is the front side of the small cushion. I finally diagnosed the problems. I was using the wrong size needle and had my machine set up for 'lightweight' fabric. After I changed the needle and settings, the quilting went much better!

This is the front of one of the large cushions. The quilting went fine and I am quite happy with this one. The back of this cushion will be quilted whole cloth in the dark brown fabric that I used for one of the bordersnand I need to come up with an interesting design. I am kind of looking at the backs of these cushions as ways to practice new free motion quilting designs.

That's all I have done at this time and I have to work tomorrow so I don't expect to get much more done until next week. I will keep posting my progress on this project both to share it with you and to help me organize what my plan for finishing it! I already have plans in the works for my next quilt, so I am anxious to finish this one!

Monday, July 26, 2010

My Sewing Studio

Last year I decided to turn my Pottery studio into a sewing studio. I love doing pottery, but it takes very strong, steady hands to work the potting wheel and I am at an age where I don't want to work that hard! So I have gone back to my first love... sewing. It used to be an unfinished shed type of building. We put up wallboard and a patio door, a little paint and some curtains, and voila! Sewing Studio!

This spring, my three sisters came for a week of sewing, talking, laughing and having some fun. We have all had some health issues in the last few years so we dubbed the week TBASSS (The Broke Ass Sisters Sewing Soiree). We had a wonderful week!

I have a Husqvarna Designer 1, a Janome Serger, and an Industrial machine for uphostery. I love them all!

These pictures were taken before I re-did the chair.
That is, all of them but this last one. I took it this morning. My husband has his "man cave".... I have my 'girlie grotto'...

Saturday, July 24, 2010

I am reupholtering a chair

Several months ago, I purchased 2 easy chairs off Craig's list. They are of good quality and exactly what I had in mind for my sewing studio. Not too big, not too small. They recline for when I am not really sewing, but hiding from other things that need to be done. This is what one of them looks like:

It took me almost 2 months to remove the old fabric! They must have used a hundred pounds of staples in just one arm! If anyone has a faster or easier way to remove upholstery staples, I would sure love to hear about it. I used a hammer, a screwdriver and pliers. Needless to say, I am not anxious to start on the second chair. Here is how the first one turned out:

I loved the colors in the fabric. We have a salvage fabric store where I live and most of their inventory is upholstery fabric. I got this for $5 a yard.

Friday, July 23, 2010

Make 3 New 'comfort' bras in 45 minutes!


I don't have hot flashes, I have meltdowns and living in the South in the long HOT summer months, I find wearing a bra uncomfortable. Especially when working in my yard, walking the dog, or just sitting on the patio. I came up with an idea for a comfy cotton bra that was inexpensive (about $6 for 3 of them). The bras are made from cotton panties! They would be great for a young girl that just needs a liner under T-shirts.


Here is how I make them:
Buy a 3 pack of cotton 'granny' panties and some elastic


Cut a V shape in the center through both layers like this. I tried it on an old pair to get an idea of how big to cut the opening. The back of the panties becomes the front of the bra.

Fold down the center and cut a little extra from the front. I like to make the neckline a little rounder. Then cut a strip of stretch Lycra or elastic a few inches shorter than the neck opening.


Sew the lycra toghether at the short end like so:


Then fold it in half to make a folded ring like this:


Pin the seam to the back center of the bra. I pin the center of the strip to the center of the neck opening to make sure it is even on both sides. Sew the lycra to the neck opening on the right side of the fabric, stretching the lycra as you go


I used the lycra just because I had some that almost matched and wanted to see how it would work out. I actually like using elastic a little better. If you use elastic, sew it to the wrong side of the fabric (stretching it as you go)


Turn the elastic under and top stitch, always remember to stretch as you stitch! I use a decorative stitch, but a simple zigzag works just fine!