Friday, December 23, 2011

SEWING VEST TUTE

This is (I hope) going to be a pictorial tutorial.(geeze, I'm such a poet) on how to make a sewing vest as posted on the quilting board around Christmas time.

1. Choose an old shirt pattern.  Size does not matter, as your are only going to use this as a guideline.

Lay your shirt pattern with shoulder seams together and draw a line as shown in red in picture.  I made the front pieces about 7 inches wide and cut it off right at the waistline.

If you want to save the original pattern, trace the new pattern on tissue paper.

You will need a little over half a yard of each fabric. 

I sandwiched my fabric with lightweight batting and practiced my FMQ by trying to outline the design on the printed fabric.

Cut your vest out according to your pattern and sew a 1/4 inch seam at the back neck.

I pressed the seam open then sewed a strip of fabic over it to creat a finished seam.

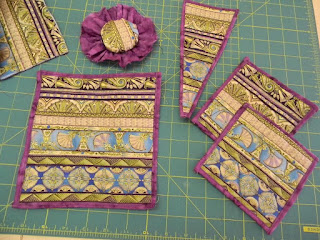
Decide how many and what size pockets you want and cut them out from left over quilted fabric.  I bound the edges of my pockets just like a little quilt.

Apply your pockets then bind the outer edge of your vest.  I added a couple of ties to help keep it in place.  The pincushion is just a stuffed yo-yo stitched to a gathered ruffle.  I also added a loop to hang glasses on and a loop to hang it on a hook when I'm finished for the day!

This is what it looks like when laid out flat on design wall.


Tuesday, September 13, 2011

purple maze

YEAH! It's finished.  This is my practice quilt. Charlotte and Janie said it was OK to make a few mistakes so I outdid myself! Mistakes galore, but I learned a lot from them and I might repeat some of the on purpose!  I did every kind of free motion quilting I could work in on these!

Quilt and wall hanging in place...

Jesse and Ted holding it up for it's photography session.

I like the partial dresden plate in the corners.

The tiny bright yellow dots are thread turds.  I did not do my direction changed fast enough and the machine left these little turds. 

Turds don't show up so much on the top... :)

Lots of thread painting on this...should have done it BEFORE sandwiching it...All that stitching made it shrink unevenly so the border looked more like a ruffle.  I stretched it onto a frame to try and work that out but it still is not quite right.

Mountain closeup

Example of dense thread painting.

charity quilt

I have not posted anything new for a while, so today I make 2 posts.  I made this quilt for a raffle for Hometown Heroes.  Turns out through some error that it actually went to an organization for our men overseas. and it will be auctioned ...not raffled.  I was very upset about it but decided to just let it go.  Tomorrow is another day and there are many more quilts to be made.


Sunday, May 22, 2011

Sew What? Seeds of course...in my Sky Garden!

Seeds of contentment.. I love having a garden, but 2 large dogs and a small back yard means you have to get creative about gardening.  I have some tomatoes on the vines and the peppers are starting to produce YUMMY! I know I won't be able to wait for them to ripen...have to have a mess of green fried tomatoes!  I have some scrap wood to make a trellis for the green beans and cucumbers to climb (down) on. So far, the dogs have shown no interest in the plants.  I put petunias on top of the tomatoes so that they would show over the top of the fence and look pretty.


Sunday, May 15, 2011

whole cloth quilted tablecloth

This was the best I could do taking pictures of the texture of this tablecloth.
I think you can get an idea of what is there from these.  There is nothing but Yards and yards of thread! I have done lots of stippling quilting and felt really comfortable with that, but I've been wanting to do some more creative things with it too.  I tried to practice these feathers on scrap fabric, but they need room to flow, so I found this fabric on sale and decided to just play around with it.  It is the perfect size for my table, so even tho it isn't perfectly quilted, it will be useful.


Monday, May 2, 2011

Gettin' on with my Red Kitchen

I finished the spice/meds cabinet and my curtains yesterday. Yipee! The only thing left is the blocks I want to make to hang on the walls... Here are the cabinet and the curtains along with the table cloth and the valance.  I promised Mom I would post pics on her blog too.  She doesn't like it when I just put a link to my blog because it takes too long to download 2 web pages.


Thursday, April 21, 2011

My $#%^$#@##%..Ahem new Kitchen window valance.

It was fun and quite easy to piece together and I was pleased with the color gradations and the chili peppers.  Ok, the piecing is not perfect, but I liked it.  I was dreading the day when I would have to free motion it because my Husky Varmit does not like to free motion.  I wanted it quilted very densley so it would hold it's shape so I did triangles with straight lines in it very close together.  This piece is 112 inches long and I knew it was going to take a while.  The pebbling around the chili peppers looked OK until I turned it over and looked at the back...OUCH...not just loose tension, but no tension at all! I could pull the bobbin thread out very easily...so OK it was not hard to rip it out readjust the tension, and do that part again. But when I started the red pieces, my thread would break about every 10 inches or so, or it would shred.  I discussed it with one sister (God bless her for listening to me whine) and she and I did some research.  I took all suggestions to heart and tried to implement them...nothing helped.  Finally I was resigned to quilting about 10 inches at a time...grrrrrr....3.... frustrating...., slow.... days later I realized that most of the thread breaks were happening when I would sew backwards. Going forwards and sideways was not so much of a problem so, I adjusted my quilt while stitching to go either forward or sideways.  That went a little faster. 
So I posted a picture on the 'sister' blog and Janie called me and said she was researching my problem (she also has a designer 1 machine) and she came across an obscure .pdf file that mentioned a 'freemotion' button.  Huh? whasat? There is a free motion BUTTON? I went out to the studio, while she stayed on the computer to read line by line how to find this unkown button....and low and behold...we found it! Burried somewhere in the 'set' tab, there is indeed a FREE MOTION BUTTON!  The black scrap below is one that I did right after getting off the phone.  In all that swirling and going back and forth, NOT ONE THREAD BREAK! 
THANKS JANIE!


Monday, April 11, 2011

My New Mantle

 Ted and I worked all weekend to get this mantle and a spice cabinet installed (I've been working on the pieces for about 2 weeks).  It's not a pro job, but I am happy with it....  We are not finished with the cabinet yet.  Will post that when we are finished... I ran into some technical difficulties...

It's made of the cheapest grade of lumber, so it's kind of rough....4 coats of paint and a lot of sanding helped but did not hide all the flaws...


close up of edging that I added...It was a challenge to get it to conform to the curve....

We still have the 'hole in the wall' above the fireplace.  I hung the painting on a piano hinge so that i can still open  it and use it for storage of stuff that should probably be thrown out...

Monday, March 21, 2011

My old chair made new...

I have posted this chair in other places to get feedback from others and the feedback has been great!
This is just a little 'behind the scenes' detail.
I bought 2 of these good quality chairs off Craig's list for $75. The upholstery was in poor shape but padding, springs and frame were outstanding.  The first one that I re-upholstered took over a month to just get it stripped down, staples removed, and back and arms dismantled.  The chair was easy to upholster once all that was done and it turned out quite nice (pics on another post in this blog). 
I have waited over a year to tackle the 2nd chair because I did not want to dismantle another one.... So I didn't dismantle it.. Bad decision!
The fabric that I used was also a bad decision...proof that 2 bad decisions do not make a good one!...did I quote that right? anyway...
I just decided not to remove the old and just 'cover it up'...
The vinyl suede would not slide over the old fabric...everything had to be tugged and yanked and pulled.  (In case you did not know this, if you grab a piece of vinyl fabric with a pair of plyers and yank on it... it rips...quite badly...)
Also, if you staple it, then have to remove the staples because the fabric needed tightening up a bit, the staple holes do not go away, plus it gives a dotted line for the fabric to tear on when you try to pull it tight.  nuff said... I was not particularly pleased with the results of my chair.

It looks OK from a distance..
 I felt a need to cover up my cover up...so to speak.
So, I made a little quiltlet cover up (a cover up to cover a cover up to cover a cover up)?
It does not hide the flaws in the upholstery job, but provides a focal point so that they are not quite so noticeable.   I backed the quiltlet with polar fleece so that it would cling to the suede fabric and not keep sliding off.  so far it has stayed put.
 This is a close up of the quiltlet.  I did not have a pattern, I just winged it with some scraps of fat quarters that were in my stash.  All in all, I am liking it now..

Friday, February 25, 2011

quilted purses


The weather has been absolutely gorgeous here for the last couple of weeks! I've been busy working on a pattern for purses.  My idea is that I would like to have a purse inside a purse. Sort of like Purse Underware....One purse has all your stuff and can be lifted out and put directly into another purse in the blink of an eye.  Makes it easy to change purses, and to keep keys, cell phone and sunglasses close at hand and within easy reach.
Let me know what you think!


Portable purse that fits inside the others...

Front of Pink purse

inside of portable purse..


Brown purse

Ipad fits in pocket!

I love the orange lining...


Poppy purse...

Gold lining with portable purse inside...

All purses with portable purse.

Small Net Book Computer fits in all purses.
Portable purse slides in and our of all purses easily.